
Oct 9, 2020 | Breakfast, Food
How do you do breakfast? I LOVE a good, quick and perfectly packaged breakfast sandwich! Not only are they easy to make, they’re deliciously fulfilling. Sausage… cheese… croissants… eggs… butter? Together, they can do no wrong.
For this recipe, you can use any meat of your choice, but smoked sausage is my favorite. I’ve also made them using shredded steak, patty sausage and bacon. Either way, you can’t go wrong! My Favorite croissants for this recipe are the Butter Croissants from Trader Joes.
Now, let’s dig in!
*You’ll notice I’ve added some suggestions with the ingredients below, but feel free to use the items that your family enjoys.
Ingredients:
- Meat of your choice (I prefer smoked sausage)
- Croissants (Butter Croissants from Trader Joes)
- Eggs
- Cheese
- Butter
Other meats I have used…
- Shredded steak
- Patty sausage
- Bacon
Directions:
- Preheat the oven to 400.
- Cut smoked sausage down the middle.
- Place sausage in the oven for 15 minutes.
- Cut croissants open.
- Scramble or fry eggs to your liking.
- Once sausages are done pat excessive grease out with paper towels and place on the bottom layer of the croissant.
- Make sure you have enough meat to cover the entire layer.
- Top with eggs and cheese.
- Butter top with croissant and place in the oven until these melts (4 minutes) and serve.

Aug 24, 2020 | Breakfast, Food
Açaí Bowls are a hit right now in our home and across the world for that matter. Demario’s requesting them to go along with his breakfast and he even has them as a post-workout snack sometimes! They’re extremely yummy, quick, filling, and an awesome treat! You can easily add your favorite protein powder, seeds, and toppings to make this bowl your new favorite as well!
Ingredients: (To make 2 Large Açaí Bowls)
- 2 Sambazon Açaí packets
- 1 Banana
- 1 cup of another fruit choice
- 1/4 – 1/2 cup of liquid (I typically used almond milk or açaí juice)
- Honey Almond Granola (Sams)
- Coconut flakes
- Toasted Almond Flakes
- Bananas
- Strawberries
- Honey Drizzle
Instructions:
- Add the Açaí, banana, strawberries, fruit of choice, and the almond milk or juice to a blender.
- Blend until it is smooth and creamy.
- Pour the smoothie into a bowl and add all the fruit and dry toppings.
- Drizzle honey on top and it’s ready to enjoy!
Jul 26, 2020 | Food, Main Menu, Tamela's Tailgate Treats
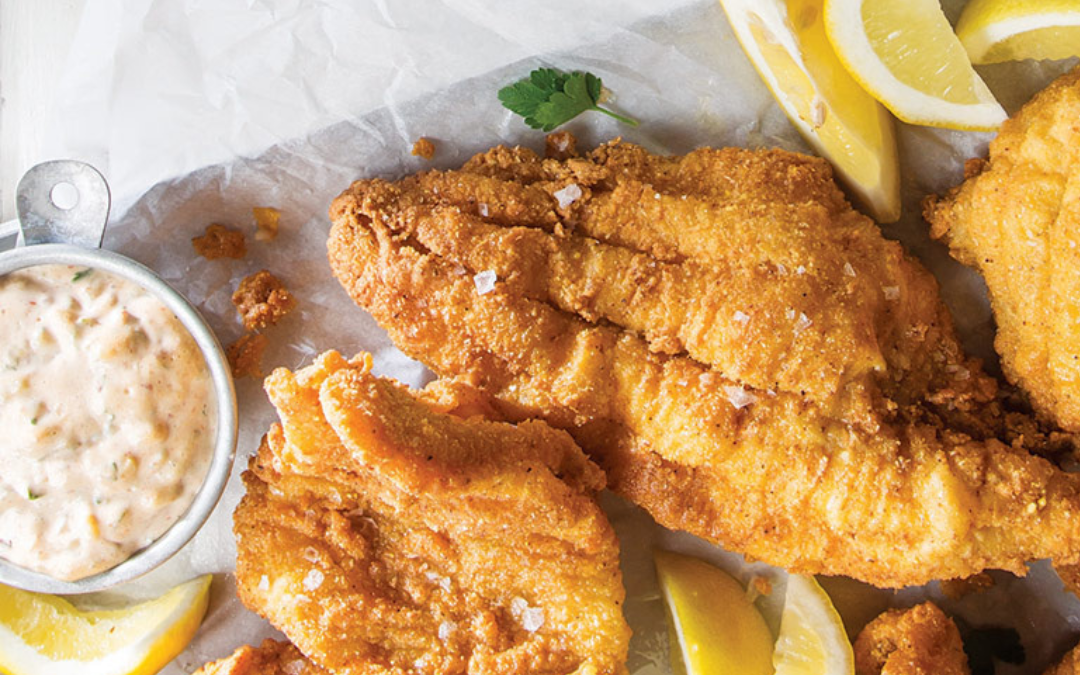
I love to treat my family and friends to this tasty recipe! The secret is getting the oil hot enough and letting the fish fry until it’s crispy! Growing up, we often had fried fish on Friday nights, and while most people wouldn’t agree with the combo, we always served it with spaghetti and meat sauce, fries, and green salad. Sometimes, I even serve lasagna instead of spaghetti.
Ingredients:
- Fresh Catfish fillets (I usually make 2 pieces per person)
- 1 lemon
- Garlic powder
- Onion powder
- 2 bags of Louisiana Seasoned Fish Fry (Blue Bag)
- 48 fl oz Canola or peanut oil, for frying
Directions:
- Wash catfish with cold water.
- Pat dry with a sheet of paper towel then squeeze lemon juice on fish.
- Trim catfish of any excess skin.
- Lightly sprinkle the garlic powder and onion powder on both sides of the catfish fillets.
- Pour Fish Fry batter in a shallow dish and drench fillets, pressing gently to coat well. Shake excess and set aside.
- Heat Canola oil in a large skillet over medium-high heat until a bit of fish batter sizzles when dropped in. I typically use an electric skillet or deep fryer to get more pieces cooked at once.
- Gently add the coated fillets to the hot oil and fry until golden brown, turning once. It may take 7-8 minutes. Make sure it’s crispy and the batter isn’t separating from the fish. It typically floats when ready!
- Remove and drain on a paper-towel-lined plate. Serve immediately.

Jul 24, 2020 | Breakfast, Food
Growing up, I was always thrilled on the weekends because my aunts and uncles would all come home to visit my grandparents. Their visits usually guaranteed that we would get my grandmother’s famous homemade biscuits and sugar syrup! It was certainly the greatest breakfast of all time. I strongly desired for my little people to enjoy this family style breakfast, which is slowly becoming a three-times a week deal, instead of only Saturdays.
After tweaking the recipe just a little, I am thrilled to share one of my family favorite syrups. It’s smooth, thick, rich, and finger-licking good! It comes together quickly and tastes amazing! With this recipe, you may never buy pancake syrup again. Even better, it stores beautifully in a mason jar!
Homemade Biscuits
Ingredients
- 2 cups of all-purpose flour
- 1 teaspoon of sugar
- 1 tablespoon of baking powder
- 1 teaspoon of salt
- 8 tablespoons of butter, cubed
- 3/4 cup of milk
Instructions
- In a large bowl, sift flour, sugar, baking powder, and salt together.
- Cut cold butter into the mixture.
- Make a well with flour mixture and slowly add milk into the middle.
- Knead the dough with your fingers and add milk when necessary. Roll out dough onto a lightly floured surface and roll out to desired thickness. Cut with a small biscuit cutter or use a mason jar.
- Butter the bottom of a skillet, (I prefer using a cast iron) and place biscuits in pan
- Bake for 15 minutes or until golden brown.
Homemade Sugar Syrup
Ingredients
- 1 cup of water
- 1 cup of brown sugar
- 1 cup of white sugar
- ½ stick of unsalted butter(optional)
- 1/4 teaspoon of pure vanilla (optional)
Instructions
- Stir together both brown and white sugars in a pan and place the pan over medium-high heat.
- Quickly add water to prevent sugar from crystallizing. Stir until the sugar is melted and the mixture comes to a boil.
- Lower the heat to medium and allow it to boil for 3 minutes.
- If using butter, gently drop the butter into the mixture and stir until the butter is melted completely.
- Remove the pan from the heat.
- If using the extract, add it, and stir it in now.
- Let the syrup stand in the pan for 5 minutes before pouring into a syrup serving dispenser, for immediate use. [For longer storage, pour into a clean mason jar.] Serve warm.
- Store leftover syrup in a tightly closed mason jar in the refrigerator for up to a month.
To Reheat Leftover Syrup:
Remove the lid from the jar, and microwave for 20 seconds. Or, place the mason jar, still lidded, in a saucepan with simmering water, and using an oven mitt or canning tongs, lift and swirl the jar from time to time until it flows freely and becomes warmed throughout.

Jul 11, 2020 | Breakfast, Food
Our family loves blueberry muffins! We enjoy them, obviously, for breakfast but also throughout the week as a quick snack. Muffin Monday is a staple to our meal schedule because this recipe is easy and delicious, and my family cannot get enough. They also make the perfect snack for little hands.
For breakfast, I typically make a quick batch of muffins with a protein (like turkey sausage) and fruit. These muffins are great for an on-the-go breakfast for the mornings when we have to hurry out of the house.
I’ve ordered muffins from local grocery stores and bakeries, but this Prince Charming of mine does not approve. Maybe it’s because my little guy enjoys helping me bake this family favorite —or maybe he just loves Mommy’s cooking. Either way, blueberry muffins are an awesome filling treat, and Daddy grabs his fair share as well!
If your family loves blueberry muffins and you don’t mind baking them from scratch, then this recipe is for you! (Krusteaz Wild Blueberry Muffin Mix is a favorite of ours when we don’t take the from-scratch way.) However, this recipe is so easy, you may never pick up a boxed mix again.
*You’ll notice I’ve added some suggestions with the ingredients below, but feel free to use the items that your family enjoys. Just don’t forget to add an abundance of LOVE!
Ingredients:
½ cup softened butter (Earth’s Balance)
1 ¼ cups sugar or 1 cup Monk Fruit for my super healthy folk
2 eggs
2 teaspoons vanilla extract
2 cups flour
½ teaspoon salt
2 teaspoons baking powder
½ cup milk (Almond Milk or Oat Milk)
2 cups blueberries, washed, drained and picked over – or 2 cups frozen blueberries, thawed
3 teaspoons sugar (optional)
Directions:
- Preheat the oven to 400.
- Mix the butter and 1 1/4 cups sugar until it is light and soft.
- Add the eggs, one at a time, beating well after each.
- Add vanilla.
- Sift in the flour, salt, and baking powder, into the creamed mixture alternately with the milk.
- Mash 1/2 cup of the blueberries with a fork and mix into the batter.
- Fold in the remaining whole berries.
- Line a 12-cup standard muffin tin (or a 6-cup jumbo muffin tin) with cupcake liners
- Fill with batter.
- Sprinkle the 3 teaspoons sugar over the tops of the muffins, reduce oven heat to 375, and bake at 375 degrees for about 30-35 minutes.
- Remove muffins from the tin and cool for at least 30 minutes.
- Store muffins uncovered in a cool dry place and eat away!

Jun 20, 2020 | Food, Main Menu, Tamela's Tailgate Treats
If you’ve met my parents, you’re fully aware that my mom does not have a love for the kitchen. My dad has always been the chef of the family, while our darling diva has a small arsenal of recipes. Now, don’t be fooled, because each meal she does packs a flavorful punch!
My mom, Pam, makes the best chili. It’s perfect at any time of year, especially when you want something easy and delicious. As a young adult experimenting in the kitchen, I’ve added my little twist, which my family and guests absolutely love.
I’ve included a few optional ingredients (like quinoa and corn), but feel free to do whatever works for your family. That’s the great thing about chili; it’s such a simple dish but you can add or remove any ingredient to make it your own. If Mommy dearest is visiting, she literally stands over me to make sure I’m following her recipe to the “T”. I can’t blame her though, because this chili is amazing! You’ll see what I mean when you make it.
INGREDIENTS
- 1 tbsp. of oil (avocado oil)
- 4 cloves garlic, minced (optional)
- 1 white onion diced fine
- 1 green pepper diced fine
- 2 tbsp. tomato paste
- 2lb. ground turkey, beef, or meatless meat crumbles (optional)
- 1 pack of chili seasoning
- 1 tbsp. chili powder
- 1 ½ tsp. ground cumin
- 1 tsp. dried oregano
- 1 ½ tbsp. adobo seasoning
- ½ tsp. paprika
- ½ tsp. curry powder (optional)
- pinch of sea salt
- pinch of ground black pepper
- 2(16-oz) cans kidney chili beans, drained
- 1(16-oz) can pinto chili beans, drained
- 1 cup of quinoa(optional)
- 1 can of whole corn, drained (optional)
- 1 (28-oz) can crushed tomatoes
TOPPINGS
- Shredded cheddar
- Sour cream
- Thinly sliced green onions
- Diced pickles(optional)
DIRECTIONS
- In a large Dutch pot over medium heat, heat oil. Add onion and cook until soft for about 5 minutes. Stir in garlic and cook until fragrant for about one more minute, then add tomato paste and stir. Add ground turkey and adobo seasoning and cook until no longer pink. Drain fat and return to heat.
- Next, add chili and curry powder, cumin, oregano, paprika, and season generously with salt and pepper to your liking. Pour in kidney and pinto chili beans and crushed tomatoes. Add (optional) quinoa or corn, drained if using.
- Bring chili to a boil. Reduce heat and simmer for 20 minutes. Season with more salt and pepper, if necessary.
- Chili gets thicker as it cooks. If you prefer thick chili, let this one simmer for an additional 30 minutes.
- Ladle into bowls and top with cheddar, sour cream, green onions, and diced pickles (optional). Oh, and please don’t forget the love, my secret ingredient!
That’s it; you’re done! Enjoy your new favorite bowl of chili!
Photo cred: Nick Evans (with Macheesmo.com)